With Revealbot's Auto post boosting feature, you can automatically boost organic posts made to a Facebook Page if they get a certain level of traction. This is one more Facebook ad activity you can put on autopilot with Revealbot. Here's how to set it up.
Click "Auto post boosting" in the sidebar in the Facebook Ads Creation section.
This is where all your auto post boosting rules will live. Click "Create rule" at the top to create our first one.
The first step will be to set up our auto boosting conditions. You can set up separate auto post boosting rules for Facebook and Instagram. In this example, we'll set up one for Facebook.
You will also need to select the Facebook Page you want this auto post boosting rule to apply to. You'll need to set up an individual auto post boosting rule for each Facebook page.
Under "Post type," you can select which types of posts are eligible for auto post boosting. You can just "x" out the ones you don't want to include.
Then you can choose how many posts you actively want to be promoted at any given time. I'll go ahead and leave mine at two.
Now comes the conditions. Since we don't want every post boosted, just the ones that do well organically, we need to create conditions to set some sort of performance threshold that a post needs to meet in order to be boosted. These conditions work very similarly to the automated rule constructor we've been using in previous lessons.
We have to select an initial metric and then a value to be less than, greater than, or equal to.
For example, let's select "Engagement rate," is greater than, 3%.
You'll notice there are a lot of different metrics to create your conditions from.
You may want to create individual auto-post boosting rules that are more applicable to a certain post type. For instance, you could create an auto post boosting rule just for links posts and set the condition based on "click rate."
Before moving on to the next step, there's another way we can set up an auto boost condition: based on a keyword inside the posts' text. To set this up, select "Post text" as the initial metric. Then you can enter a keyword or phrase as the value for the condition to check. For example, I can enter the word "sale." So anytime I make a post with the word "sale" in it, it can trigger this rule.
And of course, you can stack multiple conditions to refine your filters.
Alright, let's click "next" to move on to the next step.
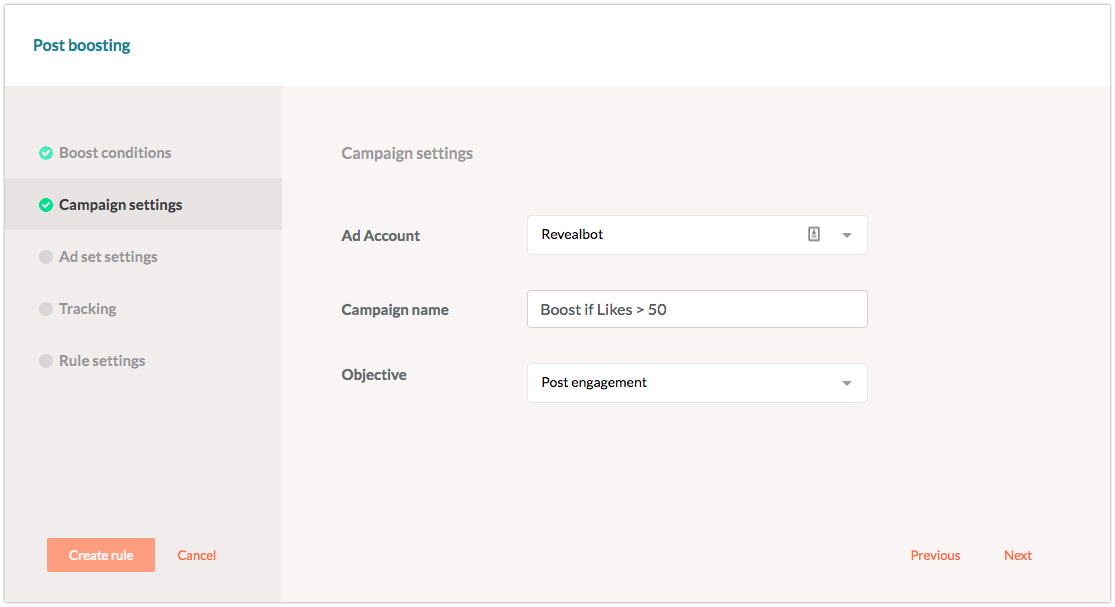
Each new auto boosted post will be created as a new ad set within one campaign. So let's choose our campaign name. For general auto-post boosting rules, you can name it something like "Auto post boosting - " as the base name and then use a Macro to add the ad account name, like this.
Since this auto post boosting rule is only applying to posts that contain "sale" in the post text, we can be a little more descriptive, like this.
Auto post boosting Sale - {{ad_account_name}}
You can choose whether you want to set up the budget on the campaign level or the ad set level. I recommend choosing the ad set level, because I think it's simple, but it's whatever you prefer.
You should choose the right objective depending on the type of posts you're choosing to auto boost. For general auto post boosting rules, you may just want to choose "post engagement" or "brand awareness." For posts with links or buying centric posts, you should choose "conversion" or "traffic."
And once you finish the rest of the settings here, we can click "Next" to set up our ad set settings.
Each new post that's auto boosted will create a new ad set, so I like to leave my ad set naming convention as the default, which just uses the post name.
You can customize how many days each post will be auto boosted for and set its budget.
Then you can choose your target audience. This is one of my favorite parts of auto post boosting because we can select custom audiences to promote our posts to, not just to people who like our page.
Click the "New audience" button, select your ad account, select your custom audiences you want to include and exclude, adjust any additional audience layers on top if necessary, then give your audience a name and click "Save." This audience will now be saved in Revealbot so you can easily use it again.
After selecting your newly created audience, select your optimization goal and billing event.
Another great feature about auto post boosting is customizing the placements. You can auto boost an organic Facebook post to Instagram, and you can auto boost an organic Instagram post to Facebook.
Once you've made your selections, click Next.
In Tracking settings, you can customize URL parameters to link website traffic back to an auto post boosting campaign and set up pixel and event tracking.
And with notifications on, you'll get a notification every time a post meets the auto post boosting conditions and is boosted, so you're always in the know of what your automation is doing.
Then click "Create" to make your auto post boosting rule live.
This is just one more way to automate your Facebook advertising.
And by creating individual auto post boosting rules by post type, or keywords in the post text, you can get really creative with how you leverage this tool to meet your advertising objectives, hands-free.